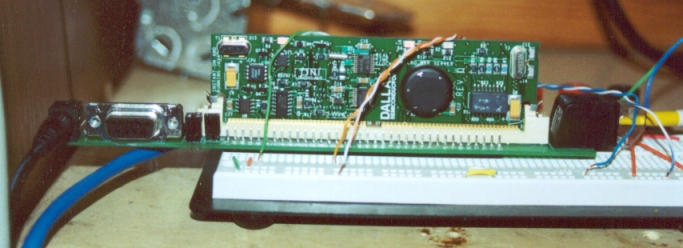
The Tini is a small, but powerful, computing device that fits on a 72
pin DIMM and runs Java. The only function it currently performs for me is
to authenticate iButtons and send signals to HV via the digital inputs on
the MFEB. The black wire on the left is 5V from a regulated power
supply. The various cables you can see plugged into the breadboard are
wires from the iButton readers and other wires that go to HV's
digital inputs. The yellow cable on the right is CAT5 and connects the
Tini to the LAN. The Tini runs a telnet and FTP server and it can be
administered from anywhere.
I wrote a small Java program that sits on the Tini and just waits for
an iButton to show up on the one-wire network. It then gets its 64bit
serial number and checks it against a text file of valid numbers and the
HV ports associated with those numbers. Once it does, it then drives that
port high and HV performs the associated actions. Currently I have four
input ports associated with iButtons -- one for each resident and one for
all guests.
If your interested in implementing your own version of this you can get
the required hardware from Dallas,
and you can get the source code for the Java program in Applications.
|

Schematic for the Tini system.
|
| Over on the right is the main iButton
reader. It's mounted just inside the door on the first floor, right
below the keypad for the alarm.
The wall is plaster and I didn't have the will to go through all
of the trouble of mounting a standard electrical box. Instead I used
a small project box from RadioShack. What you can't see in the
picture is the screw behind the perfboard holding the box to the
wall, and the hole that goes
through the back of the box and through the wall where the wires are
run to the central closet. At the top of the board is a blue LED
[it's on in the picture, but the flash washed it out] which shines
up through a translucent piece of rubber, making the whole thing
glow. It's a rather neat effect, and I tried to take a picture of it
[below] but wasn't very successful.
When the user touches and iButton to the reader, they can be
doing one of two things: leaving the house, or coming in. The user's
home/away state is tracked by a flag in HV, and whenever the user
touches his iButton HV assumes they are doing the opposite of their
current state. If a user's flag is set to home, then when they touch
their iButton HV will assume they are leaving.
Confirmation to the user is accomplished with the behavior of the
LED. If it glows steady after the user touches his iButton it means
HV thinks they are coming home. If it flashes, HV thinks they're
leaving. Pretty simple. The same thing could be accomplished with
two different LEDs.
|
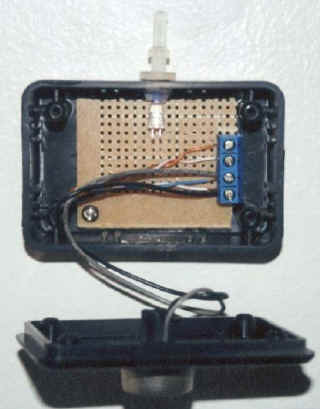
Inside the main iButton reader enclosure.
|
| The last picture on this page is the
iButton reader used to disarm the alarm when someone enters through
the basement door. Down here there's no alarm keypad so I wanted separate
LEDs to indicate status better.
When someone enters and the alarm is armed, only the red LED will
be lit. Once they touch a valid iButton to the reader the red LED
flashes for confirmation but stays lit. Once the alarm is fully
disarmed the red LED will extinguish and the green one will light --
and the user is free to proceed further into the house.
The reason for this semi-complicated setup is due to the layout
of the bottom floor. Crossing the threshold that this reader is
mounted next to puts the user in sight of one of the basement PIRs,
which would set off the alarm because this PIR is an instant
zone. So, because the time between the user touching an iButton and
the alarm being disarmed can approach three seconds [The Tini sees
an iButton on the one wire network, checks to makes sure it's valid,
drives high an input port on HV, HV sends an RS-232 message to the
automation board of the alarm, which then puts a message on the
keypad bus telling the alarm to disarm] I need to have the user wait
there before they can proceed -- which necessitates two LEDs and a
sticker with an exclamation point. |
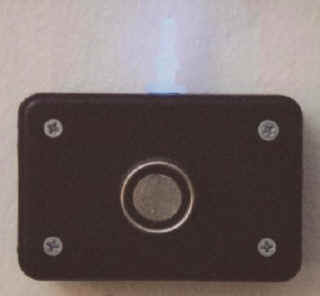
The main iButton reader with indicator lit.
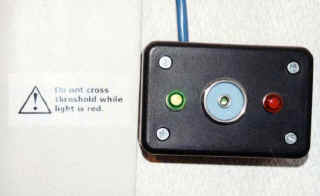
Downstairs iButton reader.
|